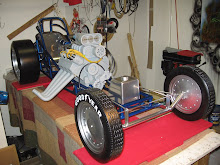
 The chassis was scaled up from a 1/16 scale kit and was built very much like a real one. The front bottom frame rails were my starting point, and everything else was built using this as my reference. The bottom rails were laid first using shims to get the correct angle on the back half. The top rails were built next using jigs and shims to keep everything square, straight and true. Once these were built, all the vertical and angled braces were added. The jigs were kept in place until the entire chassis was completed, this is important to keep from ending up with a twisted or warped structure.
  My technique for joining all the pieces is very simple but quite effective. Each piece is cut to length, then a small radius is sanded on the ends to make for a tight fitting joint, just as if they were going to be welded. Satisfied with the fit, each piece is glued in place using 5 min. epoxy. This type of glue is very strong but has minimal penetration especially with hardwood. After all the bracing is added, each joint is drilled and pegged with 1/8" dowel rod. This makes for a very strong joint. It's very important to keep the chassis in the jig until this final step is completed.
The cage and rear hoop were added last. I'm asked quite often how do I bend dowel rod?.......my usual response is "with a wood bender"!!!........If you were to think about it for a few minutes, you would realize it's quite simple really. Each piece is cut out of flat stock of the appropriate thickness and then shaped to match the dowel rod. I might also add that grain direction is important here to keep structural integrity. On the larger radius's, three pieces were butt glued running the grain lengthwise to avoid a tight curve that is cross grain with not much strength.
 After the frame was completed, it was removed from the jig and all joints were reinforced with epoxy. Final finishing is quite time consuming. Every joint was ground, and then minor fill work with automotive bondo to smooth all the seams together. After all the fill work is done, prime and paint is done just like metal would be finished. Final paint was done using automotive basecoat/clearcoat. The finished frame was well beyond my expectations, and it looks just like a miniature steel chassis..........
 now........where's my wood bender at??..........


WOW!
ReplyDeletewww.hotcars.magcloud.com