The last several months have been a real challenge, and my inspiration has been at an all time low. I've run into a lot of minor, but very time consuming problems that are inherit to scaling up such a large project from such a small reference piece. After
a lot time and aggravation,I've managed to work out most of these setbacks and I'm really getting fired up about it again, and making some great progress!!!

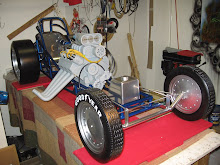
Most of the work right now is adding details to the engine and cockpit area. Lots of plumbing, wiring, linkages, handles, gauges and cool hardware!! This is really the fun part of building this type of model. The more detail I add, inspires me to add more detail...(I guess that makes sense!)...

My goal at this point is to get the engine ready for paint. Most of the detail work needs to be completed at this point before final finish. I also keep running into problems with reference material. Although there is a lot of photos of these older cars, the picture quality is lacking to say the least, and minor details are hard to find. But, I keep moving forward knowing that I can always revisit any overlooked details in the future.
When I'm building parts, each one is finished to the point of "almost" ready for paint, which means its basically "one more" coat of primer away from being painted. After all the basic detail is added, the entire engine will be disassembled for final finish, then reassembled literally like a kit!!!


I'll be posting updates more frequently in the coming months. As always...comments and suggestion are welcome, Thanks Mike
 The throttle linkage has all been soldered up, and it works too!!!...lotsa time in those pieces
 All parts are still a little rough at this point and will need some more lovin' before final paint.
 Brass throttle pedal
 Oil pressure gauge
 Gauge temporarily mounted, waiting for wiring.
 Brake handle and master cylinder.
 As always, comments and suggestions are welcome....Mike
 I'm asked quite often, "how do you make all these parts". The Parachutes are a real good example of how a typical, simple, block style piece is made. The valve covers,