Thursday, November 12, 2009

Loose ends.....


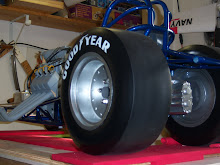
The last week or so, I've been going back and tying up a lot of loose ends that I have been neglecting. I finished building the front axle bearings which are a simple brass sleeve over the proper size bolt that fits through the spindle. Because of this, the center caps and dust covers were made to attach to the outside of the wheel instead of going through the center. This seemed to be the simplest way short of machining an actual spindle.


The center caps were cut on the lathe from a piece of Oak. After prime and paint, they were temporarily held in place with a few spots of silicone. These will be removable in case I need to pull the wheels back off.....as a side note, I've been building this type of stuff for years and I'm still amazed at how nice these little parts look after paint.....


I'm quite happy with the end result...........


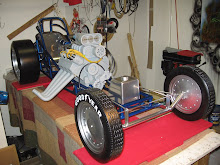
Details on the engine are coming along nicely. I'm in the process of adding lots of functional hardware that holds the engine parts together. Valve cover bolts and things of that nature are drilled, tapped and threaded, and the threads are then hardened with thin C/A, works great!

Saturday, November 7, 2009

Friday, October 30, 2009

Recent fabrication....

The throttle linkage has all been soldered up, and it works too!!!...lotsa time in those pieces

All parts are still a little rough at this point and will need some more lovin' before final paint.

Brass throttle pedal


Oil pressure gauge


Gauge temporarily mounted, waiting for wiring.


Brake handle and master cylinder.


As always, comments and suggestions are welcome....Mike

Saturday, October 24, 2009

"Carving the Chutes"..woodcarving 101

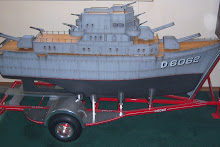
I'm asked quite often, "how do you make all these parts". The Parachutes are a real good example of how a typical, simple, block style piece is made. The valve covers, bugcatcher scoop, and several similar parts were all made in the same fashion, although a little bit more complicated, the basic principal is the same. This is basic woodcarving, and is probably my favorite type of method.

In the photo below you'll notice that most of these parts break down into very basic shapes. More often than not, the basic shape is formed and pieces are added to the main structure to build it up, which is quite the opposite of carving out the entire shape. The Blower is a good example of this. The smallest inside shape was carved first, and all the other shapes like the ribs, bottom and top decks, front and back plates, and other small details were added to the main part to build it up to the final structure. Every part can be broken down to a very basic shape. The Bugcatcher Scoop was carved from a single piece of Basswood with the only part being added to it was the thin leading edge that makes up the opening on the front.


The Chutes start out as a simple block of Basswood cut to overall size. Using a hand chisel, the basic shape is carved out.

.


The next step is to make a couple relief cuts to add some depth and to give it the appearance of the flaps folded together


Next, the random folds are carved and sanded. Anytime that I'll be making more than one part, I work both pieces at the same time to ensure that I end up with somewhat identical pieces.


Here, both parts have been shaped, sanded, and are ready for the first coats of high build Primer. As a side note, I'll sometimes seal the part first with a clear Lacquer or automotive urethane before priming, depends on the piece...


Several coats of Primer have been applied with some minor spot putty to fill in a few imperfections, and they're almost ready for paint.......In the end, I'll add some Brass rings and the ripchords to finish them up.....
As always, comments and suggestions are welcome....thanks, Mike

Tuesday, October 20, 2009

F/C: Update..It's not always fun


The last several months have been a real challenge, and my inspiration has been at an all time low. I've run into a lot of minor, but very time consuming problems that are inherit to scaling up such a large project from such a small reference piece. After a lot time and aggravation,I've managed to work out most of these setbacks and I'm really getting fired up about it again, and making some great progress!!!


Most of the work right now is adding details to the engine and cockpit area. Lots of plumbing, wiring, linkages, handles, gauges and cool hardware!! This is really the fun part of building this type of model. The more detail I add, inspires me to add more detail...(I guess that makes sense!)...


My goal at this point is to get the engine ready for paint. Most of the detail work needs to be completed at this point before final finish. I also keep running into problems with reference material. Although there is a lot of photos of these older cars, the picture quality is lacking to say the least, and minor details are hard to find. But, I keep moving forward knowing that I can always revisit any overlooked details in the future.


When I'm building parts, each one is finished to the point of "almost" ready for paint, which means its basically "one more" coat of primer away from being painted. After all the basic detail is added, the entire engine will be disassembled for final finish, then reassembled literally like a kit!!!


I'll be posting updates more frequently in the coming months. As always...comments and suggestion are welcome, Thanks Mike


Thursday, March 5, 2009

Cockpit


Building the Cockpit was an interesting project. I'll occasionally use polished Aluminum were it seems practical, it really adds a lot to the overall look. On the downside, over time it will need to be cleaned and polished, but I think I can live with that.......

The seat was hand formed out of flat stock. Six individual pieces were cut, formed, drilled, and riveted. It was then hand polished, which nicely compliments the steering column. I will eventually sew up a Leather seat cover, which should be very cool...

The steering wheel was also cut from flat stock, drilled, bent, and polished. The hand grips were carved from hardwood, stained, then attached with Brass rivets which adds a nice little touch. The steering column is made completely from wood and painted.


People often confuse the Fire Extinguisher with a Nitrous bottle, seems back then it pointed directly at the driver.....The bottle was turned on the lathe, the straps were cut from aluminum then bent to shape. The gauge was a simple painted wooden disk.

There are still some parts I need to fabricate...foot pedals, brake handle, and harness.....

......starting to look like a race car.....


Sunday, March 1, 2009

"Blower Belt"


I had been wondering how I was gonna make the Blower Belt since the beginning of this project. If I could've just bought one of these I would've......pretty slim chance of that......


I started by forming a piece of PVC around the pulleys using a heat gun to bend it to shape. This is much easier said than done.....The seam was connected using a piece of scrap PVC, which would later be ground off. With the Belt in place, I started adding the wooden blocks. Because the tolerances of the slots in the pulleys weren't exact, each one was fit individually....(this was a pain in the ass)........Once these were done, I was able to slide it off the pulleys and add the rest of the blocks. It was then sprayed with a few coats of liquid rubber, it turned out great......


Taking the Belt on and off is a challenge....the slots have to be lined up perfectly like a keyway.........it's an exact fit......