
Years of building R/C airplanes has taught me many techniques to build structures light, strong and simple. This hull was built very much like an airplane fuselage, 2 halves that would eventually be fit together to form a single structure. Keep in mind that this is the first boat that I've ever built. I was more concerned with strength than weight through this entire project realizing a lot of ballast would be needed in the end to make it sit right in the water, and I might as well have a good solid hull since I'm gonna fill it full of lead anyway. I also wanted to end up having a big fun boat that anybody could drive without worry of putting a big hole in the bottom of it.
I drew up some simple plans to determine the size and shape that I wanted. 3/16 Birch plywood was used for most of the structure.
 First the Keel and the rest of the outline was laidout. I made a pattern for each former to gradually get the shape of the hull that I thought would look right. While all the formers were temporarily in place, I laid marks to notch them for the Stringers that were to follow. After the formers were notched, they were all glued in place.
As a side note, I tend to fabricate anything that I can instead of paying for over priced wood at the hobby store. I always seem to have more time than money, so if I gotta spend a Saturday afternoon cutting my own stock, that's what I do. Besides, that what these projects are all about, building things from scratch. Sometimes it's just not practical, but I'll usually make anything that I can.
I decided to cut all the stringers that I would need. Using 3/4" White Pine, I ripped a large pile of 1/4"x1/4"x4' stringers. This is a little dangerous but if you can have a buddy on the other side of the saw helping with the feed it goes pretty quick. My Table saw is an old Sears and Roebuck that a friend of mine found in an alley years ago, as far as I can tell its from the early 40's, you cant get parts for it anymore, it has none of the modern safety features, its dangerous, but it will cut 1/8" stock all day long.
Laying all the stringers is a little tricky, this is some real wood bendin' here. Clamps and Tie wraps were used to keep things in place while the glue setup.

Once all the stringers were in place, I wanted to do some fill work to the very bottom of the hull in case of some log jumping or driving it up on the bank!!
Once all the stringers were in place, I wanted to do some fill work to the very bottom of the hull in case of some log jumping or driving it up on the bank!!

On the very front and bottom I used Aspen to fill, which is a beautiful wood that is somewhere between a hard and soft wood. It added a lot of strength and is fairly easy to work. On the large open area of the bow I used hard balsa to fill and shape.

The next step was to sheet the entire structure using 1/8" liteply. Wetting the sheeting was needed to get it to bend around all the curves. I want to add here that the entire structure needs to be clamped down flat during sheeting to prevent warping......


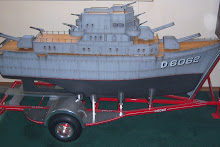
Once both halves were completed, they were joined together, shaped, sanded and fiberglassed to form a very strong hull. I cut all my own stock up to this point except for the 1/8" liteply. I believe I dropped about $150. on sheeting at the hobby store.........anybody know where I can get one of them there fancy sheeting cutters?????


No comments:
Post a Comment